Elevating robotics CI with Gazebo simulations: case study

In the field of robotics, where precision and efficiency are crucial, tools and technologies play a significant role in improving projects. However, one of the most significant challenges lies in ensuring the quality and reliability of software, particularly in the context of complex projects like robots with the capability of self-deciding in unknown and dynamically changing environments.
Furthermore, the complexity of modern robotic software cannot be understated. It encompasses a multitude of domains, including SLAM (simultaneous localisation and mapping), navigation, perception, integration with external systems, robot states, and more. These domains often involve multiple teams working collaboratively, each continuously delivering code that must function correctly in diverse environments. Ensuring the continuous verification of our software is, therefore, a formidable challenge in itself.
Let’s explore the benefits of this integration and how it can be successfully implemented in practice, especially when dealing with robots designed for autonomous navigation in diverse and dynamic environments, where thorough testing of their behaviour is paramount, and traditional testing methods often fall short.
A few words about Gazebo and Gazebo simulations
Gazebo is a powerful simulation tool that plays a fundamental role in the field of robotics, particularly in conjunction with the Robot Operating System (ROS). It serves as a dynamic and versatile simulation environment for robots, enabling engineers and researchers to create and test their robotic systems virtually, all without the need for endless sprints to the lab. Essentially, Gazebo is a time-saving solution, allowing developers to iterate and refine their creations in a risk-free simulated world.
One of Gazebo’s notable features is its seamless integration with ROS, the widely adopted framework for developing robot software. This integration allows roboticists to leverage the full power of ROS within the simulated environment. Gazebo serves as a bridge between the physical and virtual worlds, making it an essential tool for prototyping, testing, and refining robotic systems. It enables engineers to experiment with different robot designs, fine-tune control algorithms, and validate perception systems, all while benefiting from the extensive ROS ecosystem of packages and libraries.
Undoubtedly, one of the most valuable aspects worth mentioning is the open-source nature of Gazebo. This foundation fosters a thriving community of enthusiasts, provides practical usage examples, and promotes collaboration. This collaborative environment not only enhances the accessibility of these tools but also accelerates the pace of robotic development. Moreover, the seamless integration with ROS makes Gazebo an ideal choice for robotics applications, enabling users to create virtual robots, simulate sensors, and engage in a wide range of precision and efficiency-driven robotics-related activities.
Do we really need CI for software development in robotics?
It was just a rhetorical question to wake you up 😉 But, on a more serious note, CI in robotics indeed plays the same fundamental role as it does in other software projects. It provides rapid feedback to the development team, upholding software quality through automated testing, versioning, and facilitating automated deployments. Similar to any project, one of our primary objectives is to avoid regression. In essence, we aim to prevent our robot from unexpectedly losing any of its capabilities and make the delivery process stable and repetitive.
However, the difference lies in the complexity of robotics. In this realm, we deal with an abundance of potential scenarios that can arise when a robot interacts with a dynamic and ever-changing environment. Unlike traditional software, robots must adapt to real-world conditions, which adds an extra layer of challenge. CI in robotics is not just about maintaining code quality; it’s about ensuring that a robot’s behavior remains consistent and reliable amidst a multitude of possible situations. So, while CI serves a similar purpose, its significance in robotics becomes even more pronounced due to the intricacies of the field.
Exploring the synergy: integrating Gazebo simulations into robotics CI
The synergy between Gazebo and CI is crucial because it combines the benefits of realistic testing in Gazebo’s virtual environments with the efficiency of automated testing through CI. This integration empowers roboticists to validate their systems comprehensively and efficiently, ensuring that robots can perform reliably in the face of the numerous challenges presented by the real world.
Creating tests with Gazebo simulations environment helps us avoid unforeseen errors that can occur at any stage of a project. This is important because these projects often involve multiple layers of complexity. Take, for instance, navigation or mapping components such as SLAM (Simultaneous Localisation and Mapping). While these may function as separate nodes, they often work together to achieve a common goal.
With CI, we gain the ability to perform multiple tests simultaneously in an isolated environment (Docker container). One example, which shows the benefit of this approach, is the improvement of algorithms used in robotics. With each iteration or update of a given algorithm, we expect to see increased performance. Running a set of tests simultaneously allows us to assess whether a new algorithm outperforms its predecessor in terms of effectiveness. What’s more, using the Gazebo integration, we gain insight into how these algorithms perform not only in synthetic tests but also in the virtual world.
Integrating Gazebo with a robotics CI pipeline: a technical walkthrough
What we test and what we expect
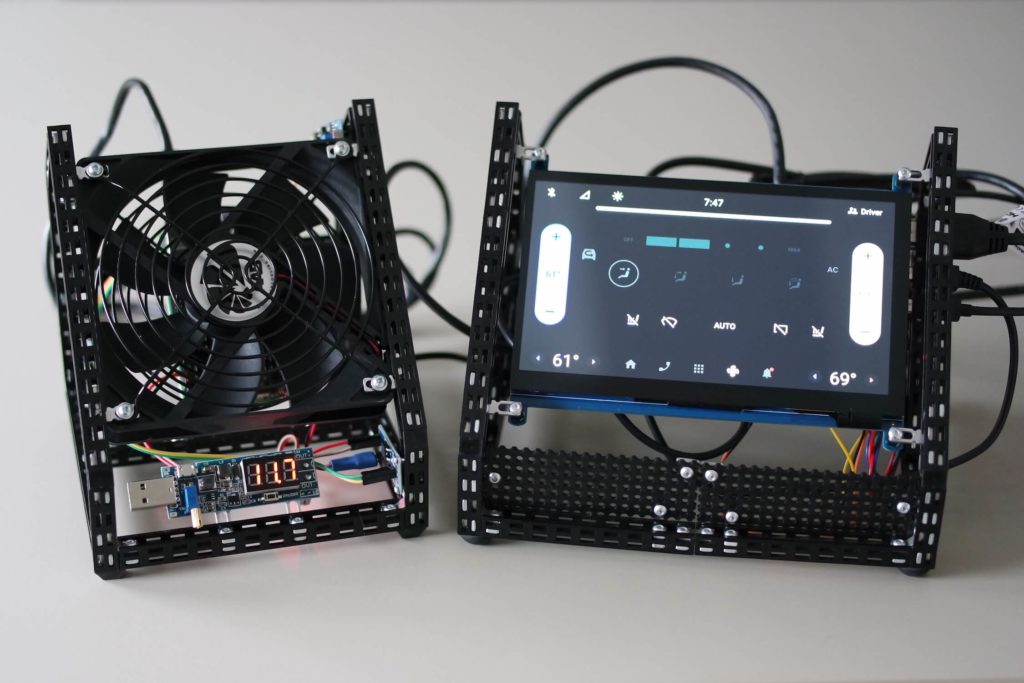
In this use case, our integration of Gazebo with CI is demonstrated through the example of our autonomous robot, Avatar. In short, the Avatar robot undergoes an initial stage of room exploration to obtain a map of its surroundings. This map serves as the basis for further activities, including navigation and more.
The software on the robot’s side is crafted using ROS2, with the implementation of relevant domains via nodes, such as SLAM, Navigation, Perception, Robot Status, Robot State, and Robot-to-Cloud Integration, ensuring the functionalities mentioned earlier. In addition, we used the technologies and structures shown below.
A presented diagram illustrates the straightforward CI steps implemented for this part of the project:
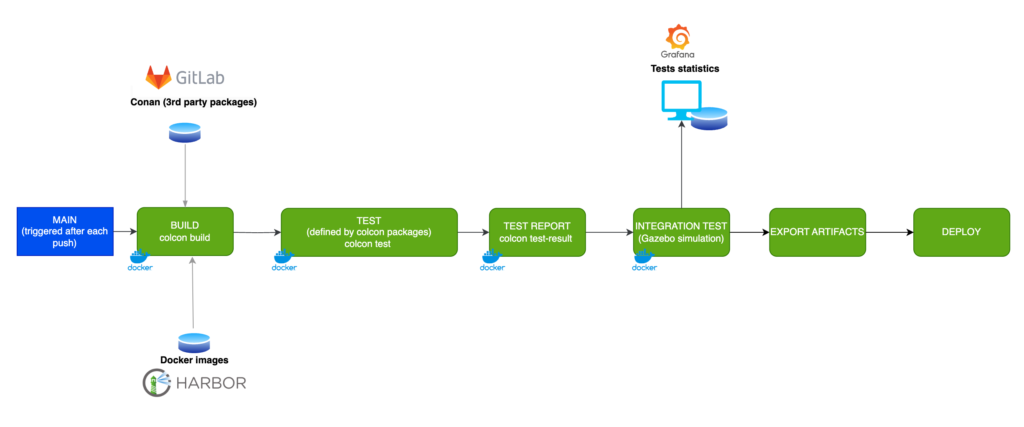
In this article, we will take a closer look at the Gazebo Simulations step. We will also explore one of the test scenarios executed in our simulator. Through this, we will familiarise ourselves with a template that can be used to add other scenarios. In our example, the test scenario will centre on the robot’s exploration phase.
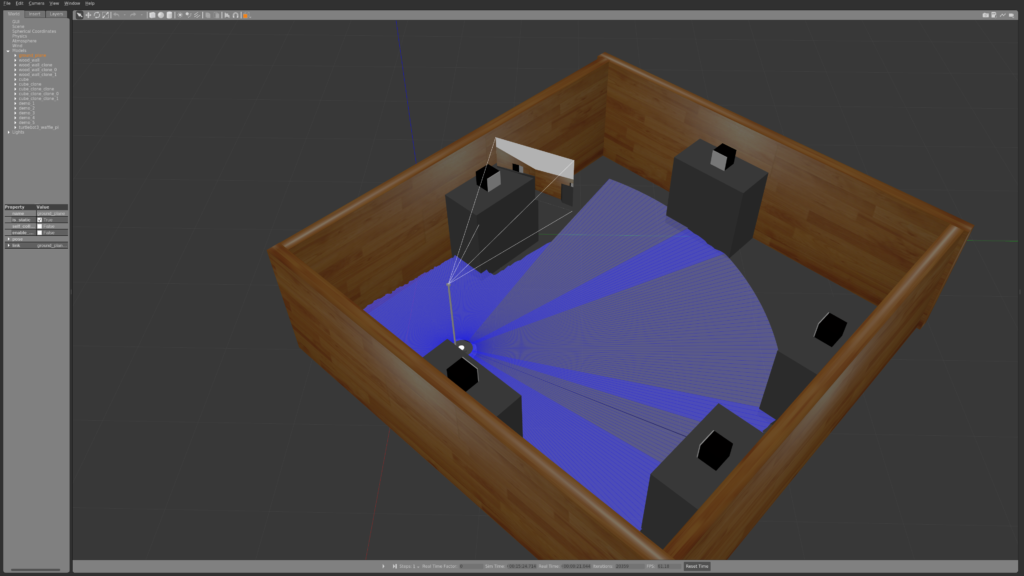
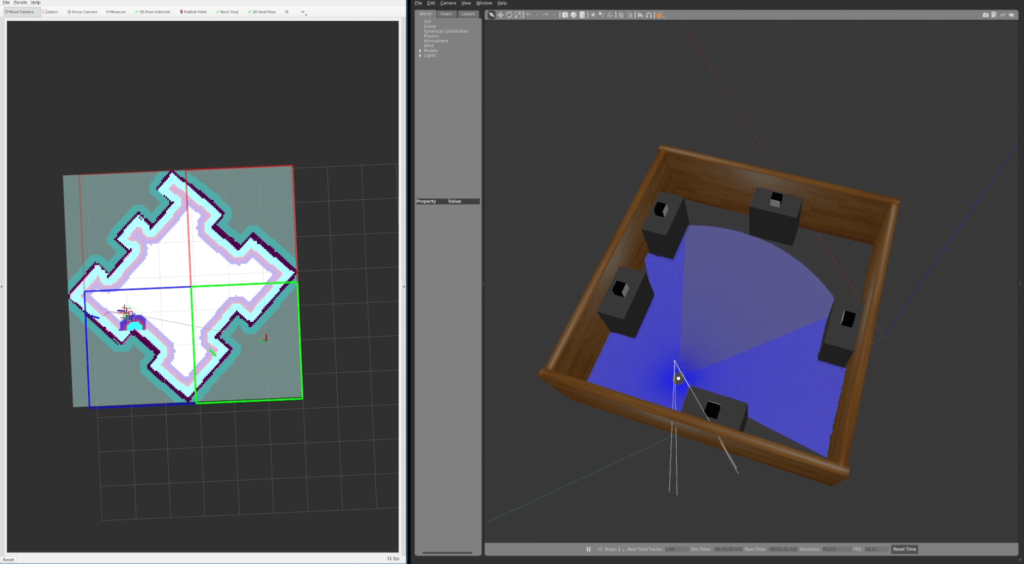
To better understand the scenario, you can refer to the three images provided below. The first image shows the beginning of the exploration, where the map is only partially discovered.
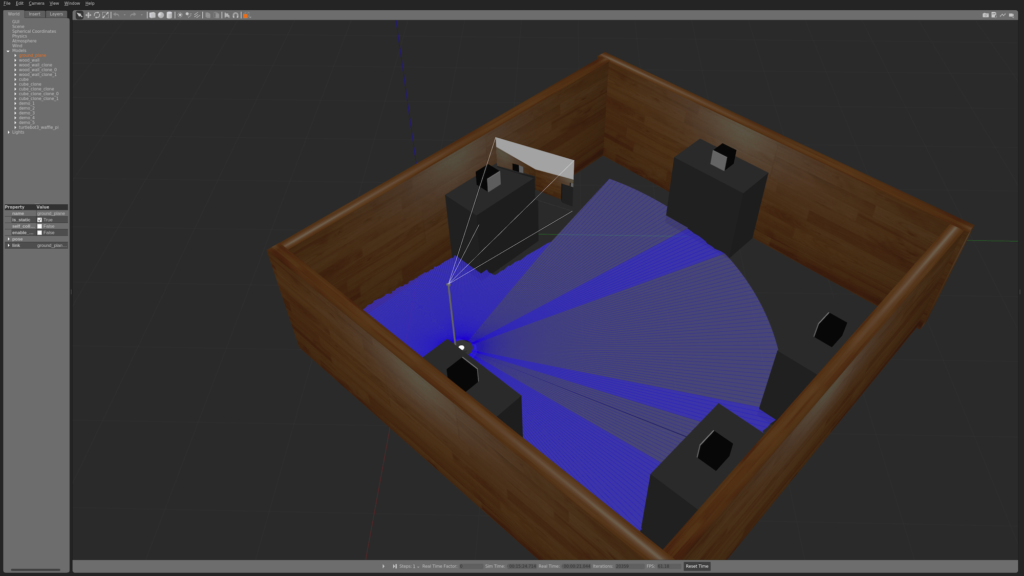
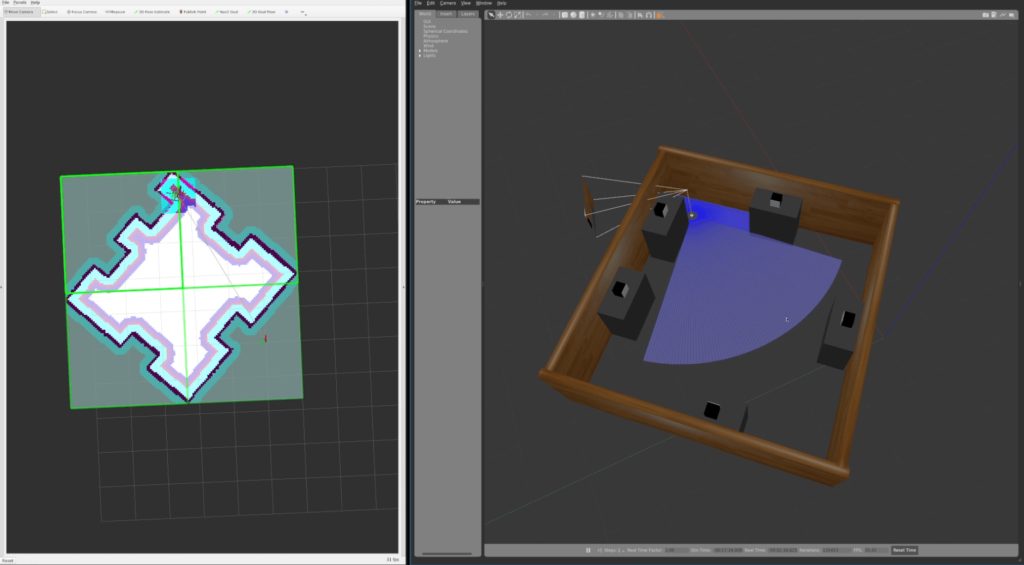
In the second image, you can observe the ongoing exploration process, as indicated by the green tiles on RViz, marking the areas that have been explored to this point.
The last image shows the culmination of the exploration, with all fields in RViz now rendered in green, indicating the full discovery of the mapped area. Now, our robot has precise knowledge of the room’s dimensions and the locations of walls or obstacles – we have completed the exploration. The next step for the Avatar is to search for demonstrations in the room and then navigate to them. The integration of CI and Gazebo simulations will help us optimise and fix bugs in the exploration algorithm, ensuring that our robot can traverse different rooms without getting trapped among obstacles or stuck against a wall.

A few words about Gazebo simulations and preparation for CI
To get Gazebo up and running in a Continuous Integration (CI) environment, it’s crucial to understand how Gazebo works. Gazebo consists of two primary modules: ‘gzclient’ and ‘gzserver’. ‘gzclient’ primarily handles the visualisation aspect of the simulation on our hardware. As you can guess, this module won’t be required for CI purposes.
The essential component for our CI setup is ‘gzserver’, which operates in headless mode without a graphical interface. This module is responsible for performing the entire world simulation, and it will be used in our testing process.
Frameworks we will use
The program designed to initiate Gazebo, along with all the nodes, is scripted in Python (launcher). This Python-based launcher streamlines the process management during testing. The Avatar project was developed using the ROS2 framework in its Galactic version, which gave us flexibility in choosing a programming language for our requirements.
For the purpose of writing tests, I have opted to use C++ in conjunction with Google’s testing framework. However, there are no restrictions preventing us from using alternatives such as Python or adopting a different testing framework for this task.
Test implementation
To test our workflow, we need to initiate a Python-based launcher.
This launcher is responsible for launching nodes that control various aspects of the robot, such as Navigation2 for robot movement and Slam Toolbox for room mapping.
Additionally, it launches a virtual world in Gazebo. Below, you’ll find the code for this launcher, along with brief descriptions of its functions:
# Launcher with gazebo virtual world
def launchers():
    return [
        IncludeLaunchDescription(
            PythonLaunchDescriptionSource(
                os.path.join(get_package_share_directory('virtual_world'), 'launch', 'avatar_launch.py')),
            launch_arguments={x: LaunchConfiguration(x) for x in (
                'x_pose', 'y_pose', 'world', 'use_rviz')}.items(),
            condition=IfCondition(LaunchConfiguration('use_virtual_world')))
    ]

# Launcher arguments
def launch_args():
    launcher_root = get_package_share_directory('avatar_robot')

    return [
        # Default arguments
        DeclareLaunchArgument(
            'params_file',
            default_value=os.path.join(
                launcher_root, 'params', 'sim_diamond.yaml'), # Parameters for simulation
            description='Full path to the ROS2 parameters file to use for all launched nodes'),
        DeclareLaunchArgument(
            'use_virtual_world',
            default_value='True',
            description='Launch virtual world launcher'),
        DeclareLaunchArgument(
            'use_gzclient',
            default_value='False', # Do not use gzclient - Only gzserver is required
            description='Launch Gazebo client'),
        DeclareLaunchArgument(
            'use_rviz',
            default_value='True',
            description='Launch RViz'),
        DeclareLaunchArgument('world', default_value='diamond_demos'), # World name
        DeclareLaunchArgument('x_pose', default_value='2.10'), # Robot start position (x)
        DeclareLaunchArgument('y_pose', default_value='1.62'), # Robot start position (y)
    ]

def generate_launch_description():
    params_file = LaunchConfiguration('params_file')
    custom_map_path = LaunchConfiguration('custom_map_path')

    return LaunchDescription(
        launch_args()
        + [
            cmd_slam_bringup(params_file),
            cmd_nav2_bringup(params_file, custom_map_path),
            cmd_nav_node(params_file),
            cmd_visualization_node(params_file),
            cmd_calc_node(params_file),
            cmd_exploration_node(params_file),
        ]
        + launchers()
    )
To execute this launcher in our test, we will create a simple C++ wrapper to manage it:
class ProcessManager
{
public:
  // Kill process if it is running
  ~ProcessManager()
  {
    if (m_pid.has_value()) {
      killProcess();
    }
  }

  // Check if process running
  bool isProcessRunning() const
  {
    return m_pid.has_value() && kill(m_pid.value(), 0) == 0;
  }

  // Kill the process and wait for it bool killProcess(int sig = SIGINT)
  {
    if (m_pid.has_value() == false) {
      return true;
    }
    kill(m_pid.value(), sig);
    waitpid(m_pid.value(), nullptr, 0);
    const bool isStillRunning = isProcessRunning();
    m_pid.reset();
    return isStillRunning;
  }

  // Fork program and start a new process
  template<typename ... Args>
  pid_t runProcess(const char * program, Args ... args)
  {
    static_assert(std::conjunction_v<std::is_same<const char *, Args>...>);
    if (m_pid.has_value()) {
      return m_pid.value();
    }
    const pid_t pid = fork();
    if (pid == 0) {
      execlp(program, program, args ..., nullptr);
    }
    m_pid = pid;
    return pid;
  }

private:
  std::optional<pid_t> m_pid;
};
Once we’ve configured the necessary arguments for this launcher, we can initiate it in code:
  // Exploration status topic
  static constexpr auto avatarTilesTopic = "avatar_tiles";

  // Timeouts
  static constexpr std::int64_t LOOP_TIMEOUT_IN_SEC = 5; // 5 sec
  // Exploration should take up to 3 minutes
  static constexpr std::int64_t EXPLORATION_TIMEOUT_IN_SEC = 3 * 60; // 3 min

  // Random initial position of the robot (must be valid)
  const auto randomPosition = RobotValidPositions.getRandomPoint();

  // Launcher arguments
  const std::string xStartRobArg = "x_pose:=" + std::to_string(randomPosition.x);
  const std::string yStartRobArg = "y_pose:=" + std::to_string(randomPosition.y);
  const std::string worldArg = "world:=" + worldName;
  const std::string rvizArg = "use_rviz:=False";

  // Launcher manager
  test_utils::ProcessManager avatarLauncher;

  // Start avatar node
  avatarLauncher.runProcess(
    "ros2", "launch", "avatar_robot", "simulation_launch.py", rvizArg.c_str(),
    worldArg.c_str(), xStartRobArg.c_str(), yStartRobArg.c_str());

  // Check if the process is running
  ASSERT_TRUE(avatarLauncher.isProcessRunning()) << "Cannot start avatar launcher";
The next step is to implement an exploration status check. The robot systematically publishes messages on the “avatar_tiles” topic to report its exploration progress. To achieve this, we’ll need to write a simple node subscriber responsible for monitoring the exploration status:
 // Set to true if all threads should be ended
  std::atomic_bool stopThreads = false;

  // Init ros
  rclcpp::init(0, nullptr);

  // Check if the exploration has been completed
  std::atomic_bool isExplorationFinished = false;
  auto processTiles = [&](const tiles_avatar_msgs::msg::Tiles & tiles)
    {
      // Check if all tiles have been processed
      if (std::all_of(
          std::begin(tiles.tiles), std::end(tiles.tiles), [](
            decltype(tiles.tiles)::value_type tile) {
            return static_cast<utils::TileState>(tile.state) == utils::TileState::eProcessed;
          }
      ))
      {
        // If all tiles have been processed, exploration is complete
        isExplorationFinished = true;
      }
    };

  // Create a ROS node and subscribe to the topic
  auto temporaryNode = std::make_shared<rclcpp::Node>("test_scan_entire_room_node");
  auto subscription = rclcpp::create_subscription<tiles_avatar_msgs::msg::Tiles>(
    temporaryNode, avatarTilesTopic, 10, processTiles);
At this point, we simply await the completion of the exploration and assess whether the test results meet our expectations:
 // Wait for exploration to end
  std::future<void> explorationWaitFuture = std::async(
    std::launch::async, [&]()
    {
      while (isExplorationFinished != true && stopThreads == false) {
        std::this_thread::sleep_for(std::chrono::seconds{LOOP_TIMEOUT_IN_SEC});
      }
    });

  // Shutdown the ROS node after exploration is complete
  std::future<void> rosShutdown = std::async(
    std::launch::async, [&]() -> void
    {
      explorationWaitFuture.wait_for(std::chrono::seconds{EXPLORATION_TIMEOUT_IN_SEC});
      rclcpp::shutdown();
    });

  // Spin the node until the exploration works
  rclcpp::spin_until_future_complete(
    temporaryNode, explorationWaitFuture, std::chrono::seconds{EXPLORATION_TIMEOUT_IN_SEC});

  // Check if timeout has been exceeded
  const bool isTimeout = std::future_status::timeout == explorationWaitFuture.wait_for(
    std::chrono::seconds(
      0));
  EXPECT_FALSE(isTimeout) << "After " << EXPLORATION_TIMEOUT_IN_SEC <<
    " seconds, the robot has not finished exploration";

  // Check if the exploration was successful
  EXPECT_TRUE(isExplorationFinished) << "Robot cannot finish exploration.";

  // Kill launcher
  avatarLauncher.killProcess();

  // Check if the launcher has been killed
  EXPECT_FALSE(avatarLauncher.isProcessRunning()) << "Can't stop avatar launcher";

  // Waiting for all asynchronous tasks to finish
  stopThreads = true;
  explorationWaitFuture.wait();
  rosShutdown.wait();
Finally, we conclude by calling the functions within the GoogleTest framework:
TEST(test_exploration, test_scan_rectangle_demos)
{
  // Create robot starting position (valid)
  test_utils::ValidPosition RobotValidPositions;
  RobotValidPositions.addBox(Point{1.12, 4.54}, Point{1.64, 0.59});
  RobotValidPositions.addBox(Point{2.32, 4.13}, Point{3.8, 1.11});
  RobotValidPositions.addBox(Point{3.92, 4.72}, Point{4.61, 3.65});
  RobotValidPositions.addBox(Point{3.51, 1.88}, Point{4.52, 0.43});
  // Start test for "rectangle_demos" world
  run_scan_test("rectangle_demos", RobotValidPositions);
}
Configuring the CI pipeline
Having prepared the tests, we intend to upload our modifications to the repository to verify their functionality; therefore, it’s time to configure our CI on GitLab. The initial step involves selecting an image – the optimal choice being one pre-installed with dependencies like ROS or Gazebo to eliminate repeated installations. In our scenario, we have a pre-prepared image stored on the server:
default:
  image: synergy/ros_galactic:3.2
As with the CI flow diagram, it will consist of 5 stages:
stages:
  - static_code_analysis
  - build
  - test
  - simulation_test
  - deploy
Each stage has a slightly different task, but let’s focus on the one that interests us most – simulation_test:
simulation_test:
  stage: simulation_test
  script:
    - . install/setup.sh
    - colcon test --packages-up-to exploration_sim
    - colcon test-result --all
  artifacts:
    when: always
    expire_in: '1 day'
    paths:
    - build/**/test_results/**/*.xml
    - install/
    reports:
      junit: build/**/test_results/**/*.xml
In this stage, a single package – exploration – is tested using Gazebo simulations. In addition, the logs generated during the test will be stored in GitLab for one day.
Leveraging GitLab, ROS, and CI simplifies the process of initiating and collecting tests significantly.
Test result
After implementation, it’s necessary to verify the functionality of our test and evaluate whether the robot successfully passed it. To achieve this, we upload the code to our Git repository and await the test results. As illustrated by the logs provided below, our robot has successfully passed the tests, with exploration completed in 113 seconds.
Start 1: test_scan_entire_room
1: Test command: /usr/bin/python3 "-u" "/opt/ros/galactic/share/ament_cmake_test/cmake/run_test.py" "/builds/robotics/avatar/avatar_robot/build/test_scan_entire_room/test_results/test_scan_entire_room/test_scan_entire_room.gtest.xml" "--package-name" "test_scan_entire_room" "--output-file" "/builds/robotics/avatar/avatar_robot/build/test_scan_entire_room/ament_cmake_gtest/test_scan_entire_room.txt" "--command" "/builds/robotics/avatar/avatar_robot/build/test_scan_entire_room/test_scan_entire_room" "--gtest_output=xml:/builds/robotics/avatar/avatar_robot/build/test_scan_entire_room/test_results/test_scan_entire_room/test_scan_entire_room.gtest.xml"
1: Test timeout computed to be: 2700
1: -- run_test.py: invoking following command in '/builds/robotics/avatar/avatar_robot/build/test_scan_entire_room':
1:  - /builds/robotics/avatar/avatar_robot/build/test_scan_entire_room/test_scan_entire_room --gtest_output=xml:/builds/robotics/avatar/avatar_robot/build/test_scan_entire_room/test_results/test_scan_entire_room/test_scan_entire_room.gtest.xml
1: Running main() from /opt/ros/galactic/src/gtest_vendor/src/gtest_main.cc
1: [==========] Running 1 test from 1 test suite.
1: [----------] Global test environment set-up.
1: [----------] 1 test from test_exploration
1: [ RUN      ] test_exploration.test_scan_rectangle_demos
1: [INFO] [launch]: All log files can be found below /root/.ros/log/2023-09-25-13-00-42-781057-runner-pyozp9em-project-81-concurrent-0jp5zf-718
1: [INFO] [launch]: Default logging verbosity is set to INFO
...
...
...
1: [INFO] [controller_server-6]: process has finished cleanly [pid 743]
1: [INFO] [bt_navigator-9]: process has finished cleanly [pid 749]
1: [INFO] [gzserver-19]: process has finished cleanly [pid 909]
1: [       OK ] test_exploration.test_scan_rectangle_demos (113240 ms)
1: [----------] 1 test from test_exploration (113240 ms total)
1: [----------] Global test environment tear-down
1: [==========] 1 test from 1 test suite ran. (113240 ms total)
1: [  PASSED  ] 1 test.
1: -- run_test.py: return code 0
1: -- run_test.py: inject classname prefix into gtest result file '/builds/robotics/avatar/avatar_robot/build/test_scan_entire_room/test_results/test_scan_entire_room/test_scan_entire_room.gtest.xml'
1: -- run_test.py: verify result file '/builds/robotics/avatar/avatar_robot/build/test_scan_entire_room/test_results/test_scan_entire_room/test_scan_entire_room.gtest.xml'
1/5 Test #1: test_scan_entire_room ............   Passed  113.29 sec
Implementation summary
The implementation presented here demonstrates a quick and simple method of integrating Gazebo simulations with CI. Thanks to this, we can protect our project from regression.
One notable aspect of this implementation is its adaptability. It can be easily modified to suit different scenarios, including the addition of new test cases, different robot models, or alternate virtual worlds. To introduce variety into the tests, we can use random variables, such as a change in the robot’s initial position, thus ensuring that each test will be slightly different from the previous one.
Furthermore, consider using a rosbag to record topics. This recording capability can prove invaluable in the event of an error, as it allows for easy playback and analysis—a particularly useful resource when dealing with sporadic or infrequent issues that need to be reproduced and investigated.
GitLab allows you to store artifacts for a pipeline, allowing, as demonstrated in ‘CI Integration’, not only to store gtest reports but also to store rosbag records.
Summary
Benefits of connecting Gazebo to CI
The integration of CI with Gazebo equips us with a powerful capability to develop tests that act as safeguards against project regression. This synergy allows us to simultaneously evaluate numerous scenarios without the need for physical hardware. We can even run nightly tests that explore extreme cases, such as changing the robot’s initial positions, Gazebo simulations offering different virtual environments, or even using different robot models in various environments.
One of the most important advantages of this approach is its cost-effectiveness. In a collaborative team environment, we no longer require a physical robot for each team member, which translates to substantial savings and resource optimisation for the project.
The plan for integrating CI with Gazebo remains analogous to various other projects. The best example is drones, which Gazebo also supports. The capabilities of Gazebo primarily define our limitations, and they are impressively wide in scope.
Are you looking for robotics specialists?
Learn how we can support your next product – check our Robotics services, and don’t hesitate to get in touch if case of any questions.
FAQ
Robotics continuous integration is the practice of automatically building, testing, and validating robotic software whenever changes are introduced. CI pipelines allow teams to detect integration issues early and verify robot behaviour using automated tests and simulations.
Simulations allow robotics teams to test behaviour without requiring physical hardware. Tools such as Gazebo make it possible to run repeatable scenarios in a CI pipeline, enabling automated validation of navigation, exploration, or perception algorithms.
Gazebo provides a realistic simulation environment for robots and sensors. When integrated into a CI pipeline, Gazebo simulations can automatically execute test scenarios and report results, helping teams validate software changes before deployment.
CI pipelines improve reliability and development speed. Automated builds, tests, and simulations help detect issues early, reduce manual testing effort, and ensure that robotics software behaves correctly across different updates.


arrow_circle_rightContact us
Transform your industry with robotics solutions. Contact our expert to find out more

Piotr Wierzba
Co-founder & Chemicals Business Unit Director
arrow_circle_right Other articles